Over the past few months that I’ve been working with graphical programming, it’s been fun to get insight into how the real world works, i.e., how things are visually laid out and move around. Sometimes it reminds me of a book I liked reading when I was younger, The Way Things Work. The book is all illustrations, so you don’t actually read it so much as pore over the details in all its drawings.
This post goes over how to program an analog-style clock like this one, with draggable minute and hour hands.

An animated clock
The clock I’m making is actually a 24-hour clock, not a 12-hour clock, but all the movement is the same.
First of all, separate out what moves in this scene from what always stays the same. There are really three different things to think about here: the clock face, the minute hand, and the hour hand. If you don’t already have some image to use as the clock face, search for one online or make one in Inkscape (There’s really no reason to use Adobe’s stuff if you don’t have to).
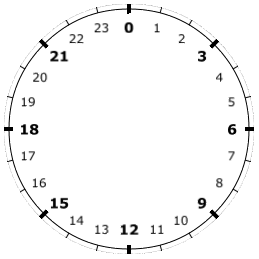
Here’s the clock face I’m using:

A clock face
Also, I’m using Pixi instead of Canvas for two reasons: I need to treat the clock hands like objects (rotating them independently of each other), and also I want to respond to mouse movements and dragging behavior.
In the code, the first thing to do is make the clock’s DOM container element and put the clock face in it. Once the DOM is ready to be interacted with (i.e., in the componentDidMount() callback if you’re using React), create the PIXI.Application, load the clock face image, and start the initial drawing procedure.
componentDidMount() {
    const me = this;

    const timePickerApp = new PIXI.Application({
        backgroundColor: 0xffffff,
        width: 200,
        height: 200,
        sharedLoader: true,
        sharedTicker: true,
        forceCanvas: true
    });
    this.timePickerApp = timePickerApp;
    this.timePicker.appendChild(timePickerApp.view);

    this.loader.load((loader, resources) => {
        me.resources = resources;

        me.drawClockScene(timePickerApp, resources.clock);
    });
}
Now let’s make the hands of the clock. Here are some relevant parts of a function called from componentDidMount(). Don’t be intimidated by all the rigmarole here… I know it looks awkward but it all comes from trial and error, building things up from the basics. For example, through putting this together I found that I need to use a PIXI.Container, even though it only contains one object, just because of a quirk with Pixi that makes Containers easier to rotate.
drawClockScene(app, resource) {
    const center = new PIXI.Point(
        app.view.width / 2, app.view.height / 2);

    // Draw the minute hand
    // Put it in a PIXI.Container so it's easier to rotate.
    const minuteContainer = new PIXI.Container();
    minuteContainer.interactive = true;
    minuteContainer.buttonMode = true;
    const minuteHand = new PIXI.Graphics()
                             .beginFill(0x666666)
                             .drawRoundedRect(
                                 0, 0,
                                 4, bg.height / 2.3,
                                 4);
    minuteContainer.addChild(minuteHand);
    minuteContainer.position.set(this.center.x, this.center.y);
    minuteContainer.pivot = new PIXI.Point(2, 5);
    minuteContainer.rotation = Math.PI;
    app.stage.addChild(minuteContainer);
    this.minuteHand = minuteContainer;
}
The code for drawing the hour hand is pretty much the same, so I’m not going to include it here. There’s a link to the full source code at the end.
When you start programming any sort of circular motion like this, you quickly learn the significance of Pi, and how to work with it along with the related Sine and Cosine functions.
You can represent angles in degrees or radians. Sometimes it’s actually more convenient to work with radians instead of degrees, it doesn’t really matter - I switch between these unit types all the time in the code. Just remember that:
A full circle == Pi * 2 radians == 360 degrees
So how would you display the minute hand at the correct rotation? There are 60 minutes in an hour, which the minute hand displays as a full circle. So you can treat each minute as one sixtieth of Pi * 2.
Here in React code, when the time state changes, the minute and hour hands are updated to reflect that state. getMinutes() returns the current time’s minute (0 to 59), and the angle of a single minute can be written as one sixtieth of Pi * 2. There’s also an offset of -Pi at the end of the equation, just because of a particularity in where the minute hand’s initial position is.
The hour hand moves in a similar way. You can replace the 24 below with 12 for a 12-hour clock.
componentDidUpdate(prevProps) {
    if (prevProps.dateTime !== this.props.dateTime) {
        // Update the clock.
        const minutes = this.props.dateTime.getMinutes();
        this.minuteHand.rotation = (minutes / 60) * (Math.PI * 2)
                                 - Math.PI;

        const hours = this.props.dateTime.getHours();
        this.hourHand.rotation = ((hours + (minutes / 60)) / 24) * (
            Math.PI * 2) - Math.PI;
    }
}
Making these clock hands draggable by the user is a whole new challenge. I’ll go over that in a separate post because there’s a lot more to it, and required a lot more learning on my part.
In the mean time, you can see the final result of this clock in the Motions of the Sun Simulator, and the source code is here: Clock.jsx. Again, there’s a lot of idiosyncratic code involved to make all the fine-tunings correct. But I hope this is helpful for anyone else making a graphical analog clock, or just as a re-usable React component.
NYU ITP has a collection of resources for making digital clocks here.
Printed from: https://compiled.ctl.columbia.edu/articles/how-to-make-an-analog-clock-part-1/

