M.O.O.C stands for Massive Open Online Course.
The name is no exaggeration. These open online courses are MASSIVE!
In this CompilED article, I’ve outlined 3 key takeaways from what I’ve learned in helping to coordinate large-scale video projects at Columbia University’s Center for Teaching and Learning.
Takeaway 1: Set the scope early in the process.
Takeaway 2: Collaborate consistently throughout the project.
Takeaway 3: Leverage Essential Graphics in Adobe After Effects.
Before we jump in
The takeaways in this article are just the tip of the iceberg when it comes to developing and producing a MOOC. The advice below is more geared towards communication and graphics. However, I’d like to take a moment here to stress the critical role that documentation plays in reducing cognitive load. Internally at the CTL, we developed a comprehensive MOOC Handbook with over 16 pages of recommended practices, technical instructions, checklists, and relevant links to other documentation generated over the years. The MOOC Handbook is a constant work in progress, with all members of the Media Team encouraged to discuss and amend the documentation based on new strategies and techniques.
Takeaway 1: Set the scope early in the process
The first step is setting expectations
Due to the grant-funded nature of our work, we often collaborate with various clients (faculty, instructors, and graduate students) who all have different priorities, schedules, and ideas. When I first came to the CTL back in 2018, something I saw happening often was that, when it came to the client, CTL staff had a hard time saying “No.” And that’s understandable, as the CTL wants to deliver exceptional service when it comes to enhancing and designing courses at one of the world’s most renowned universities.
However, being unable to say “no” leads to any worker’s worst nightmare, scope creep. Scope creep refers to how a project’s requirements tend to increase over a project’s life cycle. Many CTL staff members, especially on the Media Team, were feeling the effects of scope creep sink its claws into our projects.
The dreaded scope creep was due to several factors. However, the main one we identified is that project goals were not comprehensively defined from the start.

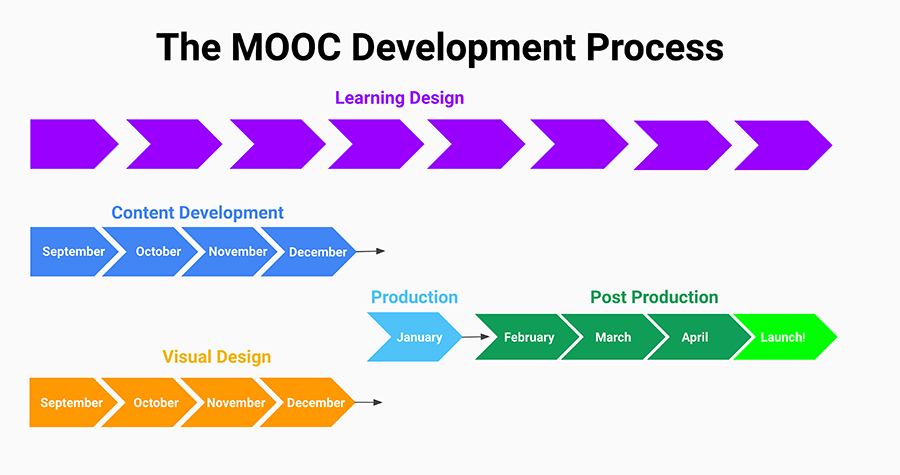
An example image representing a MOOC development and production timeline
Over the past few grant cycles, the CTL has been able to limit scope creep and streamline production in a variety of ways. What has made the largest impact, to me, is the modification of the grant application and acceptance process for projects that include software development and media production. Leadership took verbal feedback from staff and added both the associate directors for Software Development and Media Production to the RFP review and selection process. They also added much more information to the grant application that set clear expectations for our clients, should their grant be selected. Additionally, after a project is selected, prior to any development or media work commencing, the project team reviews a Preparation Agreement with the recipient of the grant to set expectations. The project team then collaborates on writing a Scope of Work document, which is signed by the client. Since these measures have been put in place, the CTL project teams and our faculty partners have a much clearer understanding of the project scope early on, helping to set the project off on the right foot and keep it on track throughout its lifecycle.
Takeaway 2: Collaborate consistently throughout the project
Schedule a series of meetings
Collaboration with an external client can always be tricky, but what’s most important is that internally the core team members are on the same page. For large projects and MOOCs, we find that the most effective teams comprise the following roles:
- Project Manager (PM)
- Learning Designer (LD)
- Media Lead (ML)
- Media Team members available to fill in for various roles, such as cinematographer, editor, animator, and graphic designer
- Developer (if applicable)
- Designer
- Assessment and evaluation
While it’s important to cut down on unnecessary meetings whenever possible, we’ve found it ideal to plan for an array of meetings that help to support the work.
These meetings include:
- Preparation Agreement signing: The PM meets with the client to go over and sign the estimation of work document that was described in Takeaway 1.
- Internal kickoff: PM, LD, and ML meet to discuss the project’s grant proposal.
- Client kickoff: PM, LD, ML, client (and TAs if applicable) meet to introduce themselves and define their roles, set up the client on Slack, and schedule a bi-weekly project meeting with the client.
- Client biweekly: PM, LD, ML, and the client meet once every two weeks throughout the length of the MOOC project in order to stay on track.
- Internal biweekly: PM, LD, and ML meet prior to the bi-weekly client meetings to discuss and resolve internal issues and tasks. These meetings can also serve as a great time to brainstorm ideas to pitch to the client.
See, that’s not too bad. However, what good are all these meetings if there isn’t a proper note-taking strategy involved? A note-taking strategy is essential to communicate roles, responsibilities, and timelines throughout the length of the project. Luckily, we’ve implemented a system that has worked well for us in several projects.
Create meeting notes documents
At the start of the project, we create two “Meeting Notes” documents within the project’s Shared Drive on Google, one that is client-facing and one that is internal. The structure is simple and flexible: use Semantics within Google Drive (Heading 1) to list the date and then take notes within the date of the meeting.

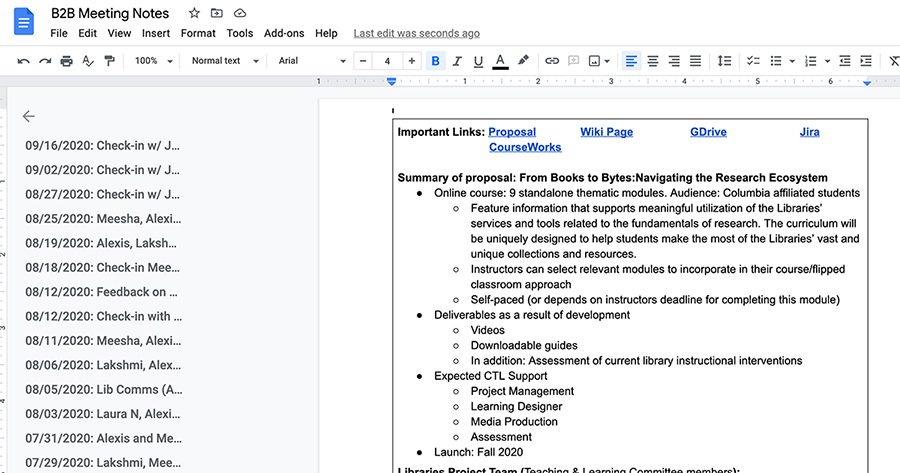
This is an example of an internal meeting notes document for the project, From Books to Bytes: Navigating the Research Ecosystem. The navigable outline on the left indicates every meeting that took place throughout the course of the project and the text within the document contains easy access to important information that is often relevant to the project.
People are still welcome to take their own notes, but the Meeting Notes document is a reliable place for managing tasks, listing questions that need to be answered, and linking to relevant sources. For a project like a MOOC, which can span over a year, these collaborative meeting notes quickly become a lifeline because they represent the mental model shared by the team. The notes are extremely easy to navigate and remind those working on the project of remaining tasks and decisions that were made months prior. Since implementing this process, I can’t tell you how many times I’ve heard the phrase, “Let’s check the meeting notes!”
Set up a Slack channel for the project
Another effective means of communication that we use at the CTL is Slack, a digital communication platform where all members of our organization have access. This application is extremely useful for cutting down on emails while simultaneously opening up and encouraging channels of communication. In fact, there are so many useful features for project management within Slack that it most likely deserves its own CompilED article. However, I will do my best to cover some of the bases here.
Not only is Slack good for ephemeral communication, but it is also great for
recall, as the chat threads generated are searchable. I’d like to highlight that
we have the capability to invite people from outside of our organization to
collaborate with us on Slack. We had great success with this in
Menstruation in a Global Context: Addressing Policy and Practice.
Our Project Manager invited our clients onto Slack, where
they had the ability to communicate with us through the designated channel,
#mooc-menstruation, or with us individually through direct messaging. This
facilitated much more open communication between the CTL team and the client and
allowed us to resolve issues and complete tasks in a timely manner.
We recognize that it can be overwhelming sometimes to be asked to learn a new application or tool. Therefore, it is necessary to stress to the client how much Slack will improve their experience throughout the length of the project. The introduction and explanation of this tool’s intended use should be scaffolded into the first meetings held with the client, so they have a solid understanding of its purpose and usefulness when it comes to communicating with us.
Takeaway 3: Leverage Essential Graphics in Adobe After Effects
Like Slack, this last takeaway probably deserves its own CompilED article. However, I wanted to touch on it here because when it comes to producing repetitive graphics for large quantities of videos, there has been no greater innovation than Adobe’s Essential Graphics. Essential Graphics is a feature found in both Adobe After Effects and Adobe Premiere. These two programs already facilitate the creation of moving graphics and images. What Essential Graphics allows you to do is templatize the designs you create so that they are easily applied and editable within your Adobe Premiere timeline.
Before Essential Graphics, the process for generating graphics for our videos was much more involved. Additionally, should changes need to be made, the process of replacing graphics was equally time-consuming. However, with Essential Graphics, the templates we generated are editable directly within Premiere, so edits and changes can be made almost instantly.
In the summer of 2020, a group of us worked together to develop a set of MOOC
Branding Graphics, identifying the most common graphics that appear in our
online courses so that we could standardize them into editable templates (called
.MOGRT files) using Adobe After Effects’ Essential Graphics feature.
After several months of discussion surrounding design and a series of rigorous tests, we developed a Spec Deck for MOOC Essential Graphics that we were able to leverage for our MOOC, Menstruation in a Global Context: Addressing Policy and Practice. This MOOC has over 40 videos, many of them around 15 minutes long. Once we had our Essential Graphics though, completing the project was infinitely more manageable, allowing us to make edits on the fly within Adobe Premiere.

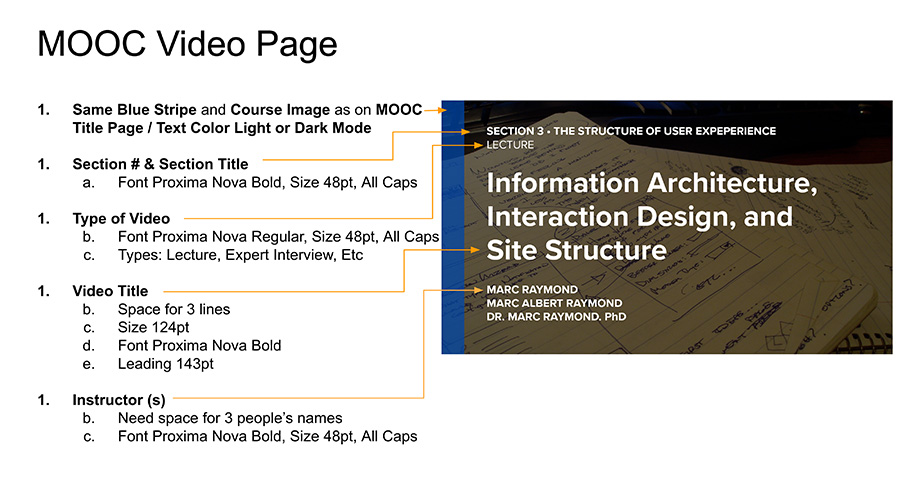
Example page from our Spec Deck for the MOOC Essential Graphics we generated that shows an image of the MOOC Video Page and the specifications required for replication.
While it might seem like a high barrier to entry, if you know how to do simple graphics within After Effects, you can teach yourself how to do Essential Graphics by watching video tutorials online. There are links to some useful ones below. I encourage all video editors to familiarize themselves with how to make simple Essential Graphics in After Effects and how to use them within Premiere for future projects.
Essential Graphics Recommended video tutorials
- After Effects CC Course: Essential Graphics
- After Effects - Responsive Animation + Essential Graphics
- Swap Images with Essential Graphics in After Effects & Premiere
- The Essential Graphics Panel in After Effects and Premiere
- How to Import MOGRT Files in Premiere Pro
Conclusion
I hope these key takeaways have provided you with some useful strategies and examples that you can draw upon when doing your own video production for MOOCs. While MOOCs have been around for a while now, they are still evolving, as is all of higher education and online courses. Research indicates that Massive Open Online Courses (MOOCS) are not as effective for learning as Small Private Online Courses (SPOCS). This is not surprising to me, as in real life, much research indicates that having smaller class sizes helps facilitate learning. MOOCs still have an important role to fill, particularly in an ever evolving global pandemic that has catalyzed the demand for more online learning resources.
By utilizing the three takeaways listed above, you will not only improve your chance for success, but you will be allowing yourself the space and supportive structure to thrive. The CTL plans to build upon these strategies as we push the boundaries of in-person and online courses, all with the goal of maximizing learning in the online space.
Printed from: https://compiled.ctl.columbia.edu/articles/making-moocs-takeaways/

