A hallmark of DevOps is the constant search for more secure methods to protect infrastructure, a process known as hardening. One change we recently implemented was to move away from managing SSH keys and whitelisting IP’s to leveraging AWS Systems Manager (SSM) Session Manager to securely connect to our EC2 instances.
Our configuration allows for an SSH connection to be tunneled through SSM Session Manager by using the AWS Command Line Interface (CLI) to connect to an EC2 instance. Since AWS CLI functions are communicated via an encrypted tunnel that originates from the instance, connections are possible even if the instance is in a security group without any inbound ports open. This allows us to further secure systems that we do not want to expose to the outside world. Although we already had strict fail2ban rules in place for SSH login failures, we felt that blocking public access to port 22 was even more secure.
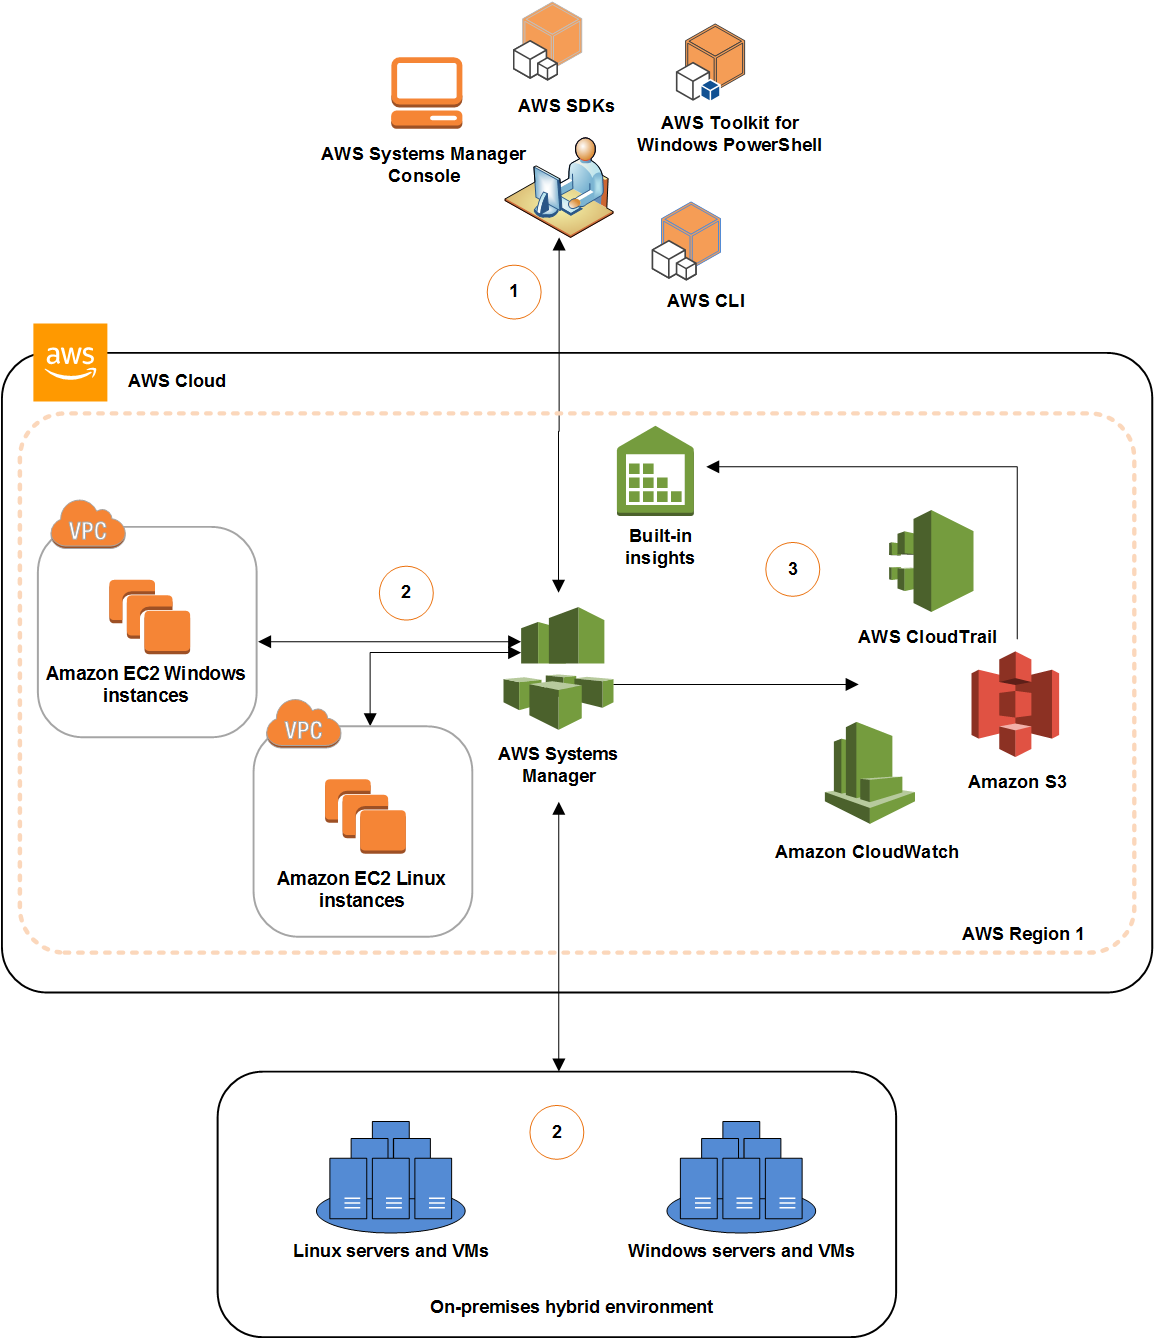
Currently, there is no cost for using SSM Session Manager to connect to EC2 instances, although other Systems Manager functions do incur charges. Additionally, access is defined via Identity access and management (IAM), and policies can be created to limit access, and events are logged in CloudTrail. The following diagram shows a high level overview of how the process works.

— Source: AWS User Guide
AWS Setup
Creating a dedicated instance and security group for the bastion:
While you can opt to use SSM session manager without having a bastion, We did not want to enroll all of our instances into Systems Manager, so we spun up a new reserved instance with minimum specs to use as a jump box/bastion host. This server was placed into a new security group with inbound connections blocked. We then modified our existing security groups to allow SSH connections from this bastion group.
Adding the Service Manager Role for Systems Manager to the instance:
Since this was our first time using Systems Manager, we implemented the
AWS managed policy, AWSServiceRoleForAmazonSSM.
Install the SSM Agent on the instance:
The instance must have
the SSM agent
installed for the magic to happen. Almost all of the AMI images provided by AWS
has it included by default, including the 18.04 LTS version of Ubuntu which our
systems are currently using. To perform Systems Manager functions, the agent
creates an ssm-user account on the system, which is also part of the
SUDOERS group. The admin permissions of this user can be revoked if desired,
and automatic updates for the agent can be managed by AWS once the instance is
added to Systems Manager. In our case, we only have one instance enrolled in
Systems Manager to act as our bastion/jump box.
User Management:
We also did not want to use our regular AWS credentials which have
administrative console access to log into servers, so we created a new user
group, sessionmanagerusers, with limited permissions to launch and terminate
sessions. We then created new users for staff needing SSH access and added them
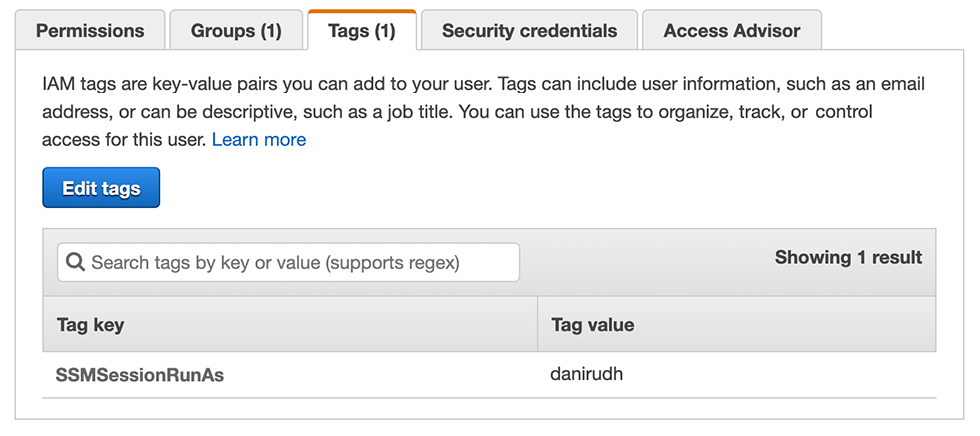
to the sessionmanagerusers group. It is also important that each user has a
tag SSMSessionRunAs with the username on the instance OS. This maps the AWS
username to the operating system username.

View our policy below: (Note: Our AWS Account ID has been redacted).
{
    "Version": "2012-10-17",
    "Statement": [
        {
            "Effect": "Allow",
            "Action": [
                "ssm:StartSession",
                "ssm:SendCommand"
            ],
            "Resource": [
                "arn:aws:ec2:*:*:instance/*",
                "arn:aws:ssm:us-east-1:*:document/AWS-StartSSHSession"
            ],
            "Condition": {
                "Bool": {
                    "aws:MultiFactorAuthPresent": "true"
                }
            }
        },
        {
            "Effect": "Allow",
            "Action": [
                "ssm:DescribeSessions",
                "ssm:GetConnectionStatus",
                "ssm:DescribeInstanceInformation",
                "ssm:DescribeInstanceProperties",
                "ec2:DescribeInstances"
            ],
            "Resource": "*"
        },
        {
            "Effect": "Allow",
            "Action": [
                "ssm:CreateDocument",
                "ssm:UpdateDocument",
                "ssm:GetDocument"
            ],
            "Resource": "arn:aws:ssm:us-east-1:AWS_ACCOUNT_ID_HERE:document/SSM-SessionManagerRunShell"
        },
        {
            "Effect": "Allow",
            "Action": [
                "ssm:TerminateSession"
            ],
            "Resource": [
                "arn:aws:ssm:*:*:session/${aws:username}-*"
            ]
        }
    ]
}
Adding Multi Factor Authentication:
By adding
multi-factor authentication (MFA),
"aws:MultiFactorAuthPresent": "true" to the ssm:StartSession and
ssm:SendCommand statement, we can ensure that connections and SSM commands
will not be allowed without a valid MFA token being present. We did have to add
an additional virtual MFA device to the newly created users to accomplish this,
but that was not a big deal to us, it just appears as another entry in
Duo/Google Authenticator.
Note: Our sessionmanagerusers policy above allows users to start sessions on
any instance enrolled in session manager, but you can be as granular as needed
by modifying the resource statements.
Local Machine Setup
Tunneling SSH Connections through an SSM session:
Since all of our servers are running Linux, we were primarily focused on ensuring that SSH and SCP could be tunneled through an SSM session, and we could work with our preferred terminal programs. Below are the steps we use to provision new development machines to tunnel SSH and SCP connections through the AWS CLI using SSM:
Step 1: Install AWS CLI Tools Version 2 on developer workstations.
Step 2: Install AWS Systems Manager plugin for AWS CLI.
Step 3: Install the aws-mfa Python module.
Note: There are many, many tools and scripts that work with temporary AWS
credentials. This package was chosen for ease of use and popularity.
Step 4: On the local machine, run aws configure to create your config and
credential files. You will need to enter your Access Key ID and
Secret Access Key. Note: The secret access key is only visible after the
account is created, or when you create an access key id under the security
credentials section of the user account in the IAM console. If you didn’t take
note of the secret access key, create a new one and you will be able to see it,
just don’t forget to revoke the old one. Set your region as needed. Output
format can be left blank, the default is json.
Step 5: Edit ~/.aws/credentials and rename the default stanza to
default-long-term.
Step 6: Run the command aws-mfa --duration 10800. Duration specifies the
amount of time in seconds for the temporary token to expire (10800 is 3h). You
will also be prompted to enter an MFA verification code. If a duration is not
specified, the default is 43200 seconds (12h).
Step 7: A successful MFA token request will output:
Success! Your credentials will expire in 10800 seconds at: 2020-10-22 04:45:10+00:00.
You can now inspect ~/.aws/credentials to see that there is now a default
section that contains the temporary token.
Step 8: Edit your ssh config file located at ~/.ssh/config and add the
following host entry, replacing the --target flag with the EC2 instance id of
the bastion server:
Host Bastion
    ProxyCommand sh -c "aws ssm start-session --target i-INSTANCE_ID_HERE --document-name AWS-StartSSHSession --parameters 'portNumber=%p' --profile default"
Step 9: Now you can create entries for each instance you need to connect to
in your ssh config. Match Host with the hostname of the machine, and
Hostname with the internal IP address of the instance (note the flipping of
the usage of these terms):
Host someserver
     Hostname x.x.x.x
     ProxyCommand ssh -W %h:%p bastion
That’s it! Now, running ssh someserver will proxy the connection through the
bastion host using the AWS CLI. Remember to generate your temporary token
first, or you will get an error message:
An error occurred (ExpiredTokenException) when calling the StartSession operation: The security token included in the request is expired
Stay tuned for the next parts and see what else we’re doing to secure our AWS infrastructure!
Printed from: https://compiled.ctl.columbia.edu/articles/secure-aws-infrastructure-1/

